Nota
Haga clic aquí para descargar el código de ejemplo completo
Dibujar cajas elegantes #
Los siguientes ejemplos muestran cómo trazar cajas con diferentes propiedades visuales.
import inspect

import matplotlib.pyplot as plt
import matplotlib.transforms as mtransforms
import matplotlib.patches as mpatch
from matplotlib.patches import FancyBboxPatch
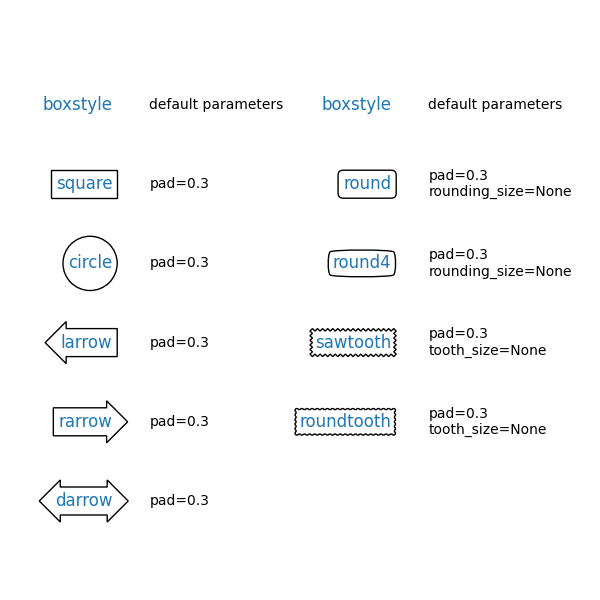
Primero mostraremos algunas cajas de muestra con fancybox.
styles = mpatch.BoxStyle.get_styles()
ncol = 2
nrow = (len(styles) + 1) // ncol
axs = (plt.figure(figsize=(3 * ncol, 1 + nrow))
       .add_gridspec(1 + nrow, ncol, wspace=.5).subplots())
for ax in axs.flat:
    ax.set_axis_off()
for ax in axs[0, :]:
    ax.text(.2, .5, "boxstyle",
            transform=ax.transAxes, size="large", color="tab:blue",
            horizontalalignment="right", verticalalignment="center")
    ax.text(.4, .5, "default parameters",
            transform=ax.transAxes,
            horizontalalignment="left", verticalalignment="center")
for ax, (stylename, stylecls) in zip(axs[1:, :].T.flat, styles.items()):
    ax.text(.2, .5, stylename, bbox=dict(boxstyle=stylename, fc="w", ec="k"),
            transform=ax.transAxes, size="large", color="tab:blue",
            horizontalalignment="right", verticalalignment="center")
    ax.text(.4, .5, str(inspect.signature(stylecls))[1:-1].replace(", ", "\n"),
            transform=ax.transAxes,
            horizontalalignment="left", verticalalignment="center")

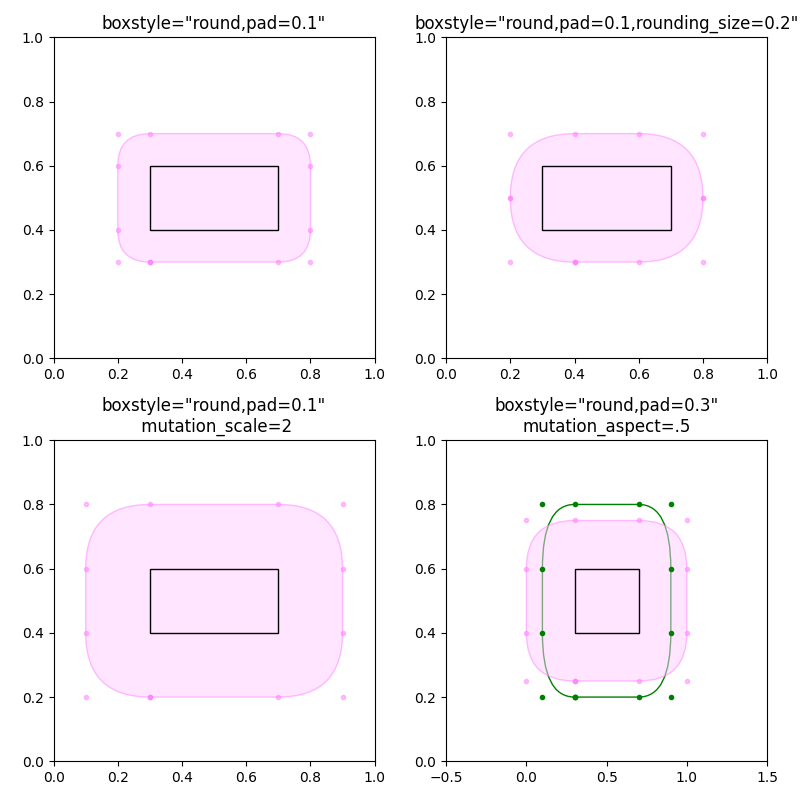
A continuación, mostraremos varias cajas elegantes a la vez.
def add_fancy_patch_around(ax, bb, **kwargs):
    fancy = FancyBboxPatch(bb.p0, bb.width, bb.height,
                           fc=(1, 0.8, 1, 0.5), ec=(1, 0.5, 1, 0.5),
                           **kwargs)
    ax.add_patch(fancy)
    return fancy


def draw_control_points_for_patches(ax):
    for patch in ax.patches:
        patch.axes.plot(*patch.get_path().vertices.T, ".",
                        c=patch.get_edgecolor())


fig, axs = plt.subplots(2, 2, figsize=(8, 8))

# Bbox object around which the fancy box will be drawn.
bb = mtransforms.Bbox([[0.3, 0.4], [0.7, 0.6]])

ax = axs[0, 0]
# a fancy box with round corners. pad=0.1
fancy = add_fancy_patch_around(ax, bb, boxstyle="round,pad=0.1")
ax.set(xlim=(0, 1), ylim=(0, 1), aspect=1,
       title='boxstyle="round,pad=0.1"')

ax = axs[0, 1]
# bbox=round has two optional arguments: pad and rounding_size.
# They can be set during the initialization.
fancy = add_fancy_patch_around(ax, bb, boxstyle="round,pad=0.1")
# The boxstyle and its argument can be later modified with set_boxstyle().
# Note that the old attributes are simply forgotten even if the boxstyle name
# is same.
fancy.set_boxstyle("round,pad=0.1,rounding_size=0.2")
# or: fancy.set_boxstyle("round", pad=0.1, rounding_size=0.2)
ax.set(xlim=(0, 1), ylim=(0, 1), aspect=1,
       title='boxstyle="round,pad=0.1,rounding_size=0.2"')

ax = axs[1, 0]
# mutation_scale determines the overall scale of the mutation, i.e. both pad
# and rounding_size is scaled according to this value.
fancy = add_fancy_patch_around(
    ax, bb, boxstyle="round,pad=0.1", mutation_scale=2)
ax.set(xlim=(0, 1), ylim=(0, 1), aspect=1,
       title='boxstyle="round,pad=0.1"\n mutation_scale=2')

ax = axs[1, 1]
# When the aspect ratio of the axes is not 1, the fancy box may not be what you
# expected (green).
fancy = add_fancy_patch_around(ax, bb, boxstyle="round,pad=0.2")
fancy.set(facecolor="none", edgecolor="green")
# You can compensate this by setting the mutation_aspect (pink).
fancy = add_fancy_patch_around(
    ax, bb, boxstyle="round,pad=0.3", mutation_aspect=0.5)
ax.set(xlim=(-.5, 1.5), ylim=(0, 1), aspect=2,
       title='boxstyle="round,pad=0.3"\nmutation_aspect=.5')

for ax in axs.flat:
    draw_control_points_for_patches(ax)
    # Draw the original bbox (using boxstyle=square with pad=0).
    fancy = add_fancy_patch_around(ax, bb, boxstyle="square,pad=0")
    fancy.set(edgecolor="black", facecolor="none", zorder=10)

fig.tight_layout()


plt.show()

Referencias
En este ejemplo se muestra el uso de las siguientes funciones, métodos, clases y módulos:
matplotlib.patches.BoxStyle.get_styles
Tiempo total de ejecución del script: (0 minutos 1.556 segundos)